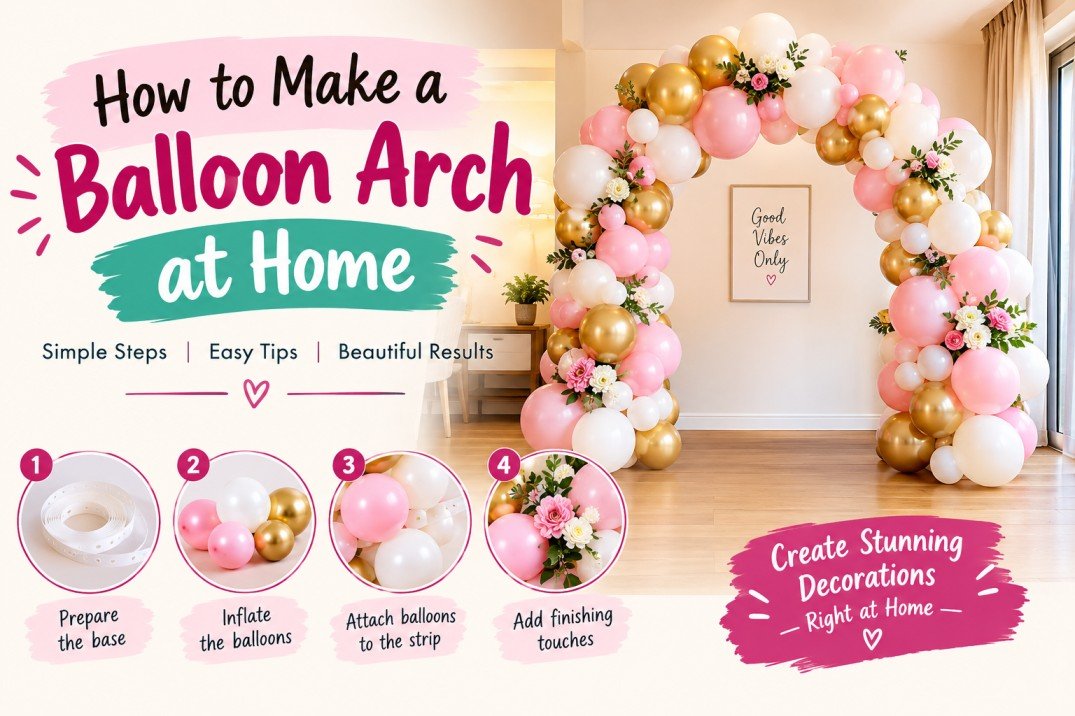
Birthday House explains how to make a balloon arch at home, what materials you need, and how to decorate it for different birthday themes.
How to Make a Balloon Arch at Home: A Step-by-Step Guide
A balloon arch is one of the most beautiful and eye-catching decorations for a birthday party. Whether you are planning a kids’ birthday party, a first birthday celebration, a baby shower, or a surprise birthday party at home, a balloon arch can transform an ordinary space into a stunning party venue.
The best part? You can make a beautiful balloon arch at home without spending too much money. With a few basic materials, the right colour combination, and some creativity, you can create a professional-looking decoration for your special occasion.
In this guide, Birthday House explains how to make a balloon arch at home, what materials you need, and how to decorate it for different birthday themes.
What Is a Balloon Arch?
A balloon arch is a decorative arrangement of balloons shaped into an arch, curve, or organic design. It is commonly used as a backdrop for birthday cakes, photography, entrance decorations, and party stages.
Popular balloon arch styles include:
- Classic Balloon Arch: A symmetrical arch made with balloons of similar sizes.
- Organic Balloon Arch: A modern design featuring balloons of different sizes.
- Half Balloon Arch: A stylish arrangement decorating one side of a backdrop.
- Balloon Ring Arch: Balloons arranged around a circular frame.
- Themed Balloon Arch: A customised design matching a birthday theme, such as princess, jungle, unicorn, or superhero.
Materials Required to Make a Balloon Arch at Home
Before starting, collect the following materials:
- Balloons in two to four matching colours.
- Balloon decorating strip or balloon arch tape.
- Balloon pump, preferably an electric pump.
- Glue dots or balloon decorating stickers.
- Fishing line or strong string, if required.
- Command hooks or suitable removable wall hooks.
- Small balloons for filling gaps.
- Scissors.
- A measuring tape.
- A backdrop stand, if you want a freestanding arch.
Pro tip: Choose good-quality balloons and use different balloon sizes to create a fuller, more professional look.
Step-by-Step Guide: How to Make a Balloon Arch at Home
Step 1: Choose Your Balloon Colours
Start by selecting a colour combination that matches your birthday party theme.
Some popular combinations include:
- Pink, white, and gold for a princess birthday.
- Blue, white, and silver for a boy’s birthday party.
- Pastel pink, lavender, and peach for a first birthday.
- Green, brown, and beige for a jungle theme.
- Black, gold, and white for an elegant birthday celebration.
Try to keep your colour palette coordinated with the cake, backdrop, and other party decorations.
Step 2: Inflate the Balloons
Use a hand pump or electric balloon pump to inflate your balloons.
Avoid inflating every balloon to exactly the same size. A mixture of large, medium, and small balloons gives the arch a more natural and attractive appearance.
Do not overinflate the balloons, as they may burst during installation.
Step 3: Attach Balloons to the Decorating Strip
Take your balloon decorating strip and insert the tied ends of the balloons into its holes.
Alternate colours and balloon sizes to create a balanced pattern. Continue adding balloons until you reach the desired length.
For an organic balloon arch, use larger balloons as the main structure and smaller balloons to fill empty spaces.
Step 4: Shape the Balloon Arch
Once you have attached enough balloons, gently bend the decorating strip into an arch shape.
You can create different designs depending on your available space:
- A full arch above a cake table.
- A half arch along one side of a birthday backdrop.
- An asymmetrical arch extending from the floor to the top corner of a backdrop.
Secure the arch to a suitable stand or stable mounting points. Make sure the arrangement cannot easily fall over.
Step 5: Fill the Empty Spaces
Look for gaps between the balloons. Use glue dots to attach smaller balloons and make the arch look fuller.
Mix different sizes carefully instead of filling every gap with the same size balloon. This creates the organic balloon effect commonly seen in professionally decorated birthday parties.
Step 6: Add Decorative Elements
Make your balloon arch more attractive by adding decorations that match the party theme.
You can include:
- Artificial flowers and leaves.
- A personalised birthday name sign.
- A happy birthday banner.
- Foil number balloons indicating the birthday age.
- Fairy lights suitable for the setup.
- A matching cake table and photo backdrop.
Keep decorations lightweight and securely attached. Avoid placing electrical connections where they can be pulled or damaged.
Step 7: Complete the Birthday Setup
Position the balloon arch behind the cake table, beside the entrance, or around a photo backdrop.
Add a birthday cake, matching table decorations, and a few coordinated props to complete the setup.
Before guests arrive, check that the arch is stable and that balloons are not blocking doors, walkways, or emergency exits.
How Many Balloons Do You Need for a Balloon Arch?
The number of balloons depends on the size of the arch, balloon diameter, and how densely you arrange them.
| Balloon Arch SizeApproximate Balloons Needed | |
| Small tabletop arch | 30–50 |
| Small half arch | 50–80 |
| Medium organic arch | 80–120 |
| Large organic arch | 120–180+ |
These quantities are estimates. A dense organic arch may require more balloons than a simple, loosely arranged arch of the same length.
How Much Does It Cost to Make a Balloon Arch at Home?
The cost depends on balloon quality, the size of the arch, and whether you already have decorating supplies.
Your budget may include:
- Balloons in different colours and sizes.
- Balloon decorating tape.
- A manual or electric pump.
- Glue dots and mounting accessories.
- A stand or backdrop frame, if needed.
A simple DIY balloon arch can be more affordable than hiring a professional decorator, particularly when you already own some of the materials. However, larger and more elaborate designs may require additional supplies and time.
Tips for Making a Professional-Looking Balloon Arch
Follow these simple tips to improve the final result:
- Use different balloon sizes: This creates depth and texture.
- Choose matching colours: Two to four coordinated colours usually work well.
- Inflate balloons evenly: Keep similar-sized balloons consistent.
- Fill visible gaps: Small balloons help create a fuller appearance.
- Prepare in advance: Allow enough time for inflation and installation.
- Secure the structure properly: Use a stable stand or suitable mounting points.
- Keep the arch away from heat: Hot surfaces and direct sunlight can damage balloons.
- Take photos in good lighting: Position the arch where the birthday backdrop looks its best.
Common Mistakes to Avoid
When making a balloon arch at home, avoid these common mistakes:
- Overinflating balloons.
- Using too many unrelated colours.
- Leaving large gaps in the arrangement.
- Attaching a heavy arch to an unsuitable wall hook.
- Placing balloons near candles, flames, or hot lights.
- Waiting until the last minute to start decorating.
- Leaving broken balloons within reach of young children.
Always supervise children around balloons. Broken and uninflated balloons can pose a choking hazard, particularly for children under eight years old.
When Should You Hire a Professional Balloon Decorator?
A DIY balloon arch is a great choice for a small home birthday party. However, professional decoration may be more suitable if you want a large entrance arch, a luxury organic balloon installation, a themed photo booth, or a complete birthday backdrop.
A professional decorator can help with colour selection, backdrop design, installation, and coordination with the cake table and other party elements.
If you are planning a birthday celebration and want a beautiful setup without managing every detail yourself, Birthday House can help you explore birthday decoration ideas and suitable party services.
Frequently Asked Questions (FAQs)
1. Can I make a balloon arch at home without a stand?
Yes. You can use a balloon decorating strip attached to suitable mounting points, provided they can safely support the arrangement. A freestanding stand is preferable for larger arches or installations where wall attachment is unsuitable.
2. How long does it take to make a balloon arch?
A simple arch may take around one to two hours, depending on its size, the number of balloons, and your experience. Larger organic arches may take longer.
3. How long will a balloon arch last?
An air-filled balloon arch can often last several days indoors, depending on balloon quality, temperature, sunlight, and handling. For the best appearance, prepare it as close to the event as practical.
4. Which balloons are best for a balloon arch?
Good-quality latex balloons are commonly used because they are available in many colours and sizes. Foil balloons can be added as decorative accents.
5. Can I make a balloon arch for a first birthday?
Absolutely! Pastel balloons, soft pink and gold, blue and white, or a theme inspired by animals and cartoons can create a beautiful first birthday backdrop.
6. Can I make a balloon arch without balloon tape?
Yes. Strong string or fishing line can be used in some designs, but a purpose-made balloon decorating strip is generally easier for beginners.
7. Is a DIY balloon arch cheaper than professional decoration?
Usually, a simple DIY arch costs less if you have the time and basic tools. Professional decoration may be worth considering for large installations, elaborate themes, or setups requiring specialised equipment.
Conclusion
Making a balloon arch at home is a creative and enjoyable way to decorate your birthday celebration. With the right balloons, a coordinated colour scheme, and a little patience, you can create a beautiful backdrop for cake cutting, family photos, and memorable birthday moments.
Start with a simple design, follow the steps in this guide, and customise the decoration to match your party theme.
Planning your next birthday party? Explore Birthday House for more birthday decoration inspiration, party planning tips, and services that can help make your celebration special.
Make your birthday beautiful, memorable, and full of colour with Birthday House!